Butterfly House Quilt Tutorial
Jenny Doan
Butterfly House Quilt Tutorial
- 1 x Pack of 10" Print Squares
- ½ yd. x Accent Fabric
- 4¼ yds. x Background Fabric
- 1½ yds. x Border Fabric
- ¾ yd. x Binding Fabric
- 5½ yds. x Backing Fabric
- 1 x Clearly Perfect Slotted Trimmer B - optional
.jpg?v=0)
Featured products Get the Supplies Featured in this Tutorial


Finish your masterpiece and let us give it the finishing touch it deserves.
Subscribe to MSQC on YouTube
Hundreds of FREE tutorials and a new one from Jenny launches every Friday.
video transcript
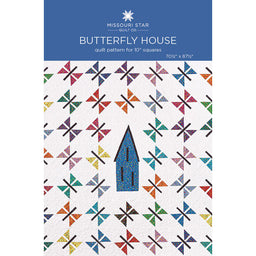
Hi everybody, it’s Jenny from the Missouri Star Quilt Company. And today I am going to show you how to make a butterfly quilt. So take a look at this quilt behind me. Isn’t this adorable? I love how happy it is. I love all the little butterflies. I love how many blocks you can get from a layer cake. We’re going to start with the butterflies. I’ll show you how to do that first. And then I’ll show you how to do this cute butterfly house. So butterflies are kind of near and dear to us here in Hamilton. We are working on a butterfly garden. And so, you know, we all love them and they’re beautiful. And I just couldn’t resist. I have these wings in my costume barrel. And I may flap them the whole time, you just never know. Let’s get to making this quilt.
So to make this quilt you’re going to need one packet of ten inch squares. And we have used Wilmington Essential Glass Beads Ten Caret Gems by Hello Angel for Wilmington Prints. You’re also going to need a ½ yard of accent fabric. Your background fabric is going to be 4 ¼ yards. And we have used this white. Your border fabric is 1 ½ yards. And your backing is 5 ½ yards of vertical seams or 2 ¾ yards of a 108. You’re also going to need a squaring tool of your choice. And we have used the ten inch square ruler from Missouri Star Quilt Company.
So to make the butterfly block we’re going to take two ten inch squares and we have this nice green here and a solid background. And we’re going to teach you the 16 method where you get 16 half square triangles out of a ten inch square. And so that’s really cool. So the first thing we’re going to do is lay a ruler right on the edge like this. And we are going to draw a line vertically and horizontally. Just like this. And just like this. Alright, then what we’re going to do is we’re going to take this to the sewing machine and we are going to sew all the way around the outside. Then we’re going to sew on both sides of this line and both sides of that line. And so I’m going to come over here and we are just going to sew this all the way around the outside, a quarter of an inch from the edge. And you can go off the edge or you can pivot. Alright so now we’re going to go on either side of the horizontal and vertical line. So I just lay my presser foot right next to the line. And I’m not too worried, I have a little pinch here, I’m not too worried about that because I’m going to cut right through that. And then this way as well.
Alright so now what we’re going to do is we’re going to cut this vertically and horizontally. So we’re just going to lay our ruler on the line and cut on the line, both directions. What that’s going to give us is four little squares that are sewn all the way around the outside like this. And then we are going to cut these diagonally, both directions just like this. And then this way. And we’re going to do that to each one of these squares. So from each layer cake here you’re going to get four butterflies. So if you use every square in your whole layer cake you’re going to get 168 butterflies. Now we only used 60 in our quilt and you can see how big it is. So if you want to make an enormous quilt or baby quilts or you know, whatever, you’re going to get a lot of butterflies from one single pack. So what we’re getting here is we’re getting four half square triangles just like this from each section. And it takes four to make a butterfly. So let’s take these over to the iron. And I”m going to press them open. And we’re going to square these to three inches. So I’m just going to roll them back. I’m making sure that I’m pressing to the dark side. So I’m just going to roll back like that. I’m going to stack these over here because to make this butterfly you will only need to learn to make one. And then you can make them all. So what I’m going to do is I’m going to take this ruler right here. It has a diagonal line on it. I’m going to put it on my diagonal seam right there. And I’m going to put it on the three line, you can see right here, it’s on the three line. But can you see right here where it’s a little bit off. That just means I’m going to flip my block and cut it from both sides. And so it’s got to line up perfectly because we want it to be nice and square. So then I’m going to turn this and do the same thing again. Only this time I have a straight side to line my butterfly up. And keep this line going right on that line. And then we’re going to just do, cut around like this. And you’re going to do this to all four of yours. You’ll square each block to three. So you won’t be cutting off too much. Let me see here, get on that line. This is the most important thing to line up and this outer edge here. This one looks pretty good on this one side. And then we’ll do two more. Cut and cut. And you can use a bloc loc, you can use the clearly perfect slotted trimmer. A lot of you have asked, can I do it with my regular ruler, yes you can and this is how. So again we’re lining up our 45 line on the seam there, making sure that this is lined up on our three mark. And then we’re just going to cut around the corner like this. And one of the things I really like about this ten inch ruler is that it doesn’t have any half inches on it because if there’s a half inch, you know, I’m going to make a mistake. I’m going to mess it up.
Alright so then what we’re going to do is we are going to sash these. Now we have this little inch sashing here that’s already cut. And the inch feels tiny but it’s not terrible. It’s just smaller, not harder. And what we’re going to do is we’re going to put this on here like this. And we’re going to match up our edges. So when I do that I lay this square, I lay this square right over the other one. So this one is already sewn on here. You can see I sewed a quarter of an inch right down here. I’m laying it back and then I’m going to attach the other one to the other side. And so you want it to go the same direction. And I’m going to lay it on here. Now to make sure it’s in the same place as the other one I’m going to line it up with the other one on top of the strip. And then I’m going to line this up with the edge of my other block. And so you have two tells right there to make sure you keep that right in line. And then I’m going to bring this over here. Now the reason I have it on this long piece, you can actually cut your little pieces into three inch pieces and just sew your little middles in. But this way I can do a whole bunch. And since we have 60 in this quilt, you know, you need to do a whole bunch sometimes. So then you can trim this off like that. And this is half your butterfly right here. And then we’re going to do that again. And so again we’re going to line our pieces into the middle like this. I’m going to lay this piece right on top, sew it a quarter of an inch down. And if I were chain piecing I would just add another and add another, you know, I would slide another wing under here and just keep sewing them on. But I’m not going to chain piece for this because I just want to show you this one. Alright, again I’m putting my piece on here, lay it on the edge, catch the edge of my block. And these are the wing separators, that’s what I call them. It’s a really technical term, the wing separators. So I’m going to press these.
And then what we’re going to do, we have these wings like this and we’re going to put in the body. So because there’s a lot of little seams right here and a lot of little pieces, a pressing tip is to make sure that this white part is pressed out flat. And then when we add the something part, it will be pressed in. So I am going to, oop I see I caught my little dog ear right here. I can just clip that. But this part, if we press it out, it will make our block lay a little flatter. So we’re going to go ahead and press this one so it’s nice and flat. And so your white goes out and they’re going to come together like this. Then we’re ready to add our body. Our body is another one inch piece and we’ve just this charcoal right here. And I’m going to trim off this selvedge. And I am just going to add it to one side of my block and trim it off. So we’re right here and I’m just going to sew this down the side. Then I’ll just trim that off. And then I’ll sew the other side too. Alright so by rolling that back, this seam is automatically pressed to the middle and that’s what we want. Alright so then I’m going to add this here to this side. We’ll lay it on here and do this. And if your, this is a little tip right here, if your bottom piece appears to be a little bit bigger as mine does, put that part on the bottom and the feed dogs will take in more fabric and it will just lay nice and flat. It will fit. It will take in that extra fabric. So we’re just going to lay this on this edge. And I’m going to just make this go right to the end. We’re sewing a quarter of an inch and then it matches up and we are going to do the same thing. So I’m just going to roll this so that that seam, wait the other direction, this way. Alright, so I’m just going to roll this back and that seam should be right together and that will help this butterfly lay nice and flat. So there’s our butterfly right there. Here’s our seam. It’s together in the back. And the white ones are out. And that just gives us a nice flat block.
Now all of these butterflies right here, we have set on point which means we’re going to cut a square and we’re going to sew a square, or a triangle to all four sides. So for this block right here we took an eight inch square just like this. And we’re going to cut it diagonally, both directions and that’s going to give us enough triangles to set the whole block on point. On point just means when you take a block from being straight like this and it turns it. And so that’s on point. So we have these four right here and they are just going to go around the block like this. So we’ll put a piece here and here. We’ll do opposite sides first. And then we’ll add our side pieces like this. And then when that block is sewn together it will have to sit this way. So it will turn it on point. So let’s go ahead and add our two side triangles. Or these are top and bottom. Now one of the things you can do with this is you can fold this in half and find the middle and then line that middle up with the middle of the body right here. Or the middle of your wing separator. I’ll do the same thing on this side. I’m just going to give it a little finger press, make a crease so that I can line that right up in the middle right there. Alright, then what I’m going to do is press these back and I’m just going to roll them back like this. And then I’m going to add my two triangles to the other side, just like this. And it should come all the way out to the edge. You should see like a little quarter of an inch stick over on each side. You can also, right here together, when you put these side pieces on like this. If you’ve got them on there right it should make a little square right here. You can see right through it and it should make a little square. So we’re going to go ahead and sew these down. You know it’s helpful to have all these little tips so we get these things right lined up. And again I could just crease it and line it up on the middle as well. Alrighty I’m over here. Alright now we’re going to press this open. So now here it is pressed open.
And this is a block set on point. And we’re going to square this to nine. And this block is actually, so see here, here’s our nine inch. So it’s just tiny little bits off. So we’re just going to take off a tiny bit right here. And then I’m going to flip this and lay it on that nine inch line across and cut it. Using my ruler there’s nine across here. This is a ten inch ruler so I can clearly see that this is lining up with the nine edge. And then we’ll do the same thing to the other sides. So once you have a straight side you can line that up on the top and bottom and make sure that’s straight. And then you’ll see it overhang just a little bit into the next square and that’s what you’re going to trim off. You just want to make sure that you have enough room here for your seam. And then we’re going to go here and trim this off as well, just like that. And then you get this gorgeous little butterfly block. Again we’ve made 60 of them for our quilt here and you can make 168 of them out of this one layer cake.
So hiding behind me this whole time is this butterfly house. And we thought it would be really fun to include a butterfly house. We did make it so that if you don’t want the butterfly house you can just put three more butterflies in here and it will take up that space. But we thought the house was such a fun idea. So we have this little house and it’s just so cute. They’re really for decoration. They’re also for, you know, a little bit of a sanctuary. But, you know, I don’t think the butterflies actually use them for anything really but it’s fun to have and fun to have in our garden and fun to see. And we thought it would be fun to make and put one right in our quilt. So it’s a little bit different sewing for us and most of the work is in the cutting so I’m going to show you how to do that. You’re going to need two ten inch squares to make this. And so we’re going to cut our pieces out of these two ten inch squares.
So the first thing we’re going to do is we’re going to cut a 2 ½ inch strip right off the side, just like this. And we are going to cut that into 2 ½ by 6 ½ and 2 ½ by 3 ½. So if I cut a 3 ½ inch piece right here the other piece should be 6 ½. So let me just check that to be sure. And it is. So this is a 2 ½ by 6 ½. This is a 2 ½ by 3 ½. Then we’re going to cut a two inch strip right here.And these are going to be two by five. You’re going to need two of those. So one there and one there. Then we are cutting, we’re going to cut this in half. We’re going to do a 4 ¾ inch square and so we’re going to lay this right on that ¾ inch line right here. So we’ve got one, two, three, four and ¾ by 4 ¾. So we’re going to cut this square here and this little bit right here is just waste. And there’s our 4 ¾. Now out of this part we’re going to cut a 3 ½ by five and so I’m, it’s five inches. Oh it’s a little bit longer so I’ll have to trim that off. So 3 ½ by five like this.And then I’m just going to trim this off so it’s five. Alright so now you’re going to need two 2 ½ inch pieces, two by 2 ½. Sorry. And so I’ve got a two by 2 ½ right here. And then I’ve got another two by 2 ½ here. And then out of this big piece over here we’re going to cut a 3 ½ by 4 ½ and a 3 ½ by five. So I’m going to come over here and cut a five inch strip like this. And then I’m going to cut a 3 ½ by five and there we go, 3 ½ by five. 3 ½ by five. And then I’m going to cut 3 ½ by 4 ½. So move it down here to the half line, I’m over here at the 3 ½ line and I’m going to cut up and over. And those are all the sizes that you need to make your butterfly block. So let’s put that together.
So there’s this great diagram inside our pattern and it shows all the pieces and how they go and how to put them together. And so once you get your pieces cut for your house, you’re going to need some background. So you’re going to need two two by 9 ½ background strips, two 4 ½ by 9 ½ for the top and bottom of your block. You’re going to need, this is going to be your roof sides, five by 11 ½. And then you’re going to need a little bit of charcoal for the butterfly doors so this is a one inch piece. And you’ll need these for your butterfly doors and for the sides of your roof right here. So these here, your butterfly doors, that’s what I mean by that. And then we’re just going to put it together. So I have all my pieces laid out on my design board and they’re together in little units. So the first thing I’m going to do is I’m going to sew these doors to the side piece. And then I’m going to sew the top and the bottom. That’s one unit. And so a lot of you are like me and we sew by pictures, you know, we don’t do well with a pattern. And so I’m just going to walk you through this so you can see this is real easy. Alright, then we’re going to press this back a little bit. And I’ve got my big house over here. Move that over here a little bit. Alright so then we’re going to, once we have this little butterfly door on we’re going to put a top and bottom piece on this one. And I actually really thought the butterfly houses were a thing, you know, butterflies actually, but it’s kind of a sanctuary for them. They’ll go in there sometimes and hide but they don’t have a real purpose. And so I was like, oh well, at least I can give them a little sanctuary, a little spot to go if they need to get away from it all. Or it’s pouring down rain. Alright so we’re going to press this. And then we’re going to come over here and I’m going to do this same thing on the other side. I’m going to sew this piece to this and then this bottom piece on here and then we’ll attach it to the side piece right here. So this is the two by five strip I believe. And if you want, you can finger press these. I made a little nest in my sewing area. I have my iron, I don’t even have to get out of my chair when I iron. And just sew it right there. Now let’s see, let me make sure I’m doing this right. That goes to the middle so this goes down here. And I’m just going to put that on there and sew here. And then I’ll head over here and press that down. And then I’m going to attach it to this side right here. And everything is matching up so we know we’re putting the right pieces together. Ok. Press this part open.Then we’re going to add the top piece right here. I just love it when they come together. I’m always surprised because I’m not a real careful sewer but always surprised. I’m just so happy about it. Alright we’ll press this one and then the body of our house will be together. And because we did these opposite then the doors set off like this, you know, so they’re in two different places which makes it fun. I’m just going to lay this one here, line it up on the edge and sew right down the side. There we go. Alright.
Alright so now we are going to attach our sides to the house. And these are our 2 ½ by 9 ½ inch pieces. And they’re going to go right on the side like this. And these design boards are great for laying this kind of stuff out, keeping it all in one place. Alright, there we go. And then one on the other side over here. Now I’m just going to flip this over. And the reason I’m doing that, again, is this piece for some reason, because of my seam allowance or something, it’s a little bit longer so the feed dogs will take in more fabric. So I’m just going to flip it over and sew from the other side because I know the feed dogs will scoot that little ease in right there. And they’ll end up exactly right. And it doesn’t even show. I’m not sure exactly how that works. But today we’re going to wing it. Alright, now we’re going to do the top of the house. There’s a little butterfly doorway in here. So we’re going to sew these two pieces together to this middle right here, line those up. And I’m just going to finger press this piece back and then I’m going to add this other piece on the other side. Alright, I’m going to press this. And I’m going to press these seams together right here so this lays down nice together. Alright. And then what we’re going to do is we’re going to center this piece on the top. You can see it doesn’t line up. It doesn’t match. It’s not right on there. But I’m going to fold it in half, make a little press line. And I’m just going to line this up in the middle of my charcoal where my little press line is, right like that. Look and make sure you have about the same on both sides because we’re going to put sides on this and trim this roof down. Alright so now we’re just going to press this up.
Alright so now what we’re going to do, we have our little top here and it has to turn into a peak. And it’s not any degree ruler so we’re just going to wing it again. So I’m making a press line here in the middle like this. This is right in the middle of my piece. And I’m going to take my ruler and I’m going to go from that press line to this outside corner right here. So just right here through that outside corner, we’re going to trim right there to the press line just like that. This comes away. Then we’re going to do the same thing from that point over here to this point and trim that off. Now what we’re going to do is we’re going to outline our roof right here with the one inch piece like this. And I’m just going to add it to both sides like this. And we’re just going to sew that on a quarter of an inch. This is interesting, when you deal with little tiny pieces, you know, myself particularly, I don’t sew a lot of little tiny pieces. So it is interesting. It makes you a little nervous at first and then you just realize it’s not any different, it’s just smaller. We’re still sewing a quarter of an inch. Alright, so then I am going to press this back right here. Because I need to know how far up to go with my other piece. And I’m going to trim this all off when I get it all sewn on. Alright so now I’m going to add my other piece right here like this. And I’m not trimming up here yet because that’s going to come to a sharp peak. Alrighty. And we’ll press that back. Then what I’m going to do here is I’m going to straighten this off on the bottom right here and trim off those little legs and then I’m going to come up here on the top and I’m going to trim this. Follow the line of my peak and then I’m going to follow the line of this one as well. And that will make our nice sharp peak. And then what we’re going to do is we’re going to add sides to this so that’s our 5 ½ by 11 or sorry our five by 11 ½ inch pieces. And we are going to start at the bottom right here.
So we are going to sew these on from the top down to make sure we have enough room at the bottom. So I’m going to line that up here. And see I’ve got it right here. I’m going to put it right up here close to the peak. And we’re going to sew a quarter of an inch right there. We want to make sure we have enough when it wings out because it’s going to wing out at an angle, we want to make sure it has enough to cut it straight. And I learned this through trial and error. Alright, then we’re going to press that out and add the other side. Again we’re going to start from the top. Make sure we have a quarter of an inch seam up there and then run it down the side like this. And flip it over and line it up on there. Just sew down this side. There we go, just coax it out to the edge. Alrighty. Now we’re going to press this back. Alright so once you get your side pieces on, it’s going to be kind of a funny shape but we’re going to fix that.
First thing we’re going to do is we’re going to cut top and bottom. And so we’re just going to make sure we have about a, you know, just enough room on the top so we can get a seam and still keep our point. I’m cutting this about a half an inch above the point right there. And now that’s nice and straight. And now this part right here we’re going to cut right off this bottom piece. We’re going to use the bottom of our roof to make our cut. And so I’m going to cut this way. And then I’m going to scoot this down here following this and cut this way. And then what I’m going to do now while it’s in this state which still looks kind of weird but we’re going to do it anyway is we’re going to attach this to the bottom of our house. We want to make sure that this roof line falls right and that this doorway is right. So I’m going to take this house right here and I’m going to find my center by creasing a line. Then I’m going to lay it right in the middle of my doorway, I mean, ya in the middle of my butterfly doorway. And I think to keep it there I will grab a couple of pins. Don’t be shocked. I’m just going to grab a couple of pins to keep it right there. And put one over here. And then this should be right in the middle of our block. Let me check to make sure my crease line is right there and it is. Alright so now we’re going to sew that on a quarter of an inch. And then we are going to press it open and see how we did. Hey we did pretty good. We did pretty good. Alright.
So this whole house unit ends up being nine by 26. It’s a great big house. And we’re going to trim the sides off. And we’re going to trim this now to nine. And we’re just a little bit over. So I just put my house a quarter of an inch over. So you’re going to want to grab your longer ruler to do this so you can do it in one fell swoop. And we’re going to go right here along the edge. And we’re looking over here and we’re going to count, one, two, three, four, five, six, seven, eight, nine and we know that we’re over on this side. Let me get right here. Make sure our bottom is lined up exactly. And when you’re all lined up you can make that cut. Now doesn’t that roof look better at least on one side. So I’m going to flip this over. I’m going to lay it so it goes right on the exact line on the mat. And then I’m going to come over to nine and I’m going to trim this. So one, two, three, four, five, six, seven, eight, nine right here. And trim this side. So we’re going to add a top and bottom piece onto this block now so that it fit the space. We wanted to make sure that it equaled exactly three butterfly blocks so that you can either put butterflies in there. So maybe you don’t want your house in the middle. Maybe you want it over here or over here or down in a corner or maybe you just want a ton of butterflies. We wanted you to be able to do whatever. So this block has to measure 26 at the end. So we have some 4 ½ inch pieces here that we’re going to attach to the top and the bottom. And then we’ll trim that down and it will just be perfect for fitting in that space. And so we’re just going to sew here a quarter of an inch, sew these across. So these are nine by 4 ½ inch pieces. And we’ve got one on the bottom and we’ve got one on the top. There we are. Now let’s press those open. Alrighty.
Ok so depending upon your seam allowances, mine came out to 27 ½ which means that I need to trim ¾ of an inch on each side. You know you could trim it all from the bottom or all from the top, whatever you want. It just has to total 26 so that’s what I want you to watch for. It’s 26 by nine. So trim this off here. And then what I’m going to do is I’m going to lay this over here before we cut again and make sure that I’m over here at 26 right here. And I get ¾ of an inch off of this one too or about. There we go. And then you have this cute little butterfly house that is ready to add to your quilt right here, maybe up here, maybe right, you know, wherever you want it. You can just wing it. Have I said that too many times? Probably.
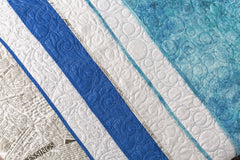
So the way we’ve set this, we have one, two, three, four, five, six, seven rows by one, two, three, four, five, six, seven, eight, nine long. And of course take out for these. We also, because our blocks are set on point, we didn’t feel the need for an inner border so we have this nice big six inch outer border out here.And our backing, isn’t that pretty? This is a really fun line of fabric. Our quilt pattern on this is called Butterflies and Flowers and it’s adorable and perfect for this quilt. And it makes a quilt that is 70 by 87. So I just want to talk for a minute about the layout of this quilt. So you can see the butterflies. Now we have the exact layout in the pattern but there is no rhyme nor reason to these butterflies. We really wanted them to look like they were flying and so we turned some in, you know, we have these three, these three in, you know, but I mean they’re all going different directions and so you can do that however you like. And you can, you know, turn one, turn them all, whatever you want to do. But we do have a diagram if you want yours to be just like ours but I suggest you have fun with this and let them fly wherever they want to. And we hope you enjoyed this tutorial on the Butterfly House Quilt from the Missouri Star Quilt Company.
We hope you enjoyed watching this video. If you’re not already part of the Missouri Star quilt family you can hit the subscribe button below so you won’t miss a thing. And if you click that bell it will notify you every time a new tutorial comes out. See you next Friday.
...& Progress on Social